Tuesday, January 31, 2012
The Short arm of the Law.......or is it the Law of the Short Arm?!?
Why have we not figured out some clever way to moderate how much tissue paper a child can take when going potty???? How many times must we reach the bathroom door, as we dash around doing the "must do's" on our "to do" lists, only to find that we now have the pleasure of taking a break from the mundane to add the ever uglier task of assessing who is the culprit in the latest toilet paper disaster anddddd then clean IT up.....Eehhhhh (I shudder to the point of almost convulsing) ???? I have tried to teach my children to count the nearly invisible squares, or to "just take a tiny piece", which almost always ends requiring more cleaning than if they hadn't taken any at all, and then there's my favorite option, stalking them every time they go potty so that you can help them take the right amount. Well I in no ways claim to have the answer to an all important issue such as this but I have found a fairly successful trick until such a time comes as we find a real solution. I have simply taught my children to measure the toilet paper against the length of their arms from their grip to the bend in their elbow. This little trick actually does work quite well, little arms are a lot shorter than little guesses on how m much to tissue to take!
Tuesday, January 24, 2012
Let a little sunshine in!!!
Since our little bundle came early I have been working on doing all the final preparations I didn't get to do before he came. I have still not finished the sanding/distressing the crib yet but I also had another little project to add to the crib set so I finally took the time to do it. I took some of the rungs from the Jenny Lynn crib that we shrunk down for Aaron's nursery and combined them with and old wooden window (w/out the glass of course) and made a shelf / blanket rack for over his bed.
 |
| Shelf view 2 |
 |
| Close up |
It is still all coming together and I want to do a few more things.... I just have to figure out what's missing and add it!!! I'm sure this will not be the last you hear of it at least Haha :)
Monday, January 23, 2012
Our LITTLE bundle is here!!
Jan 11th:
Julie's water broke last night and she had her baby just before midnight, it's a little early and he is a little small weighing in at 4 pounds and 10 ounces. The delivery was a c-section because the baby was breech and placenta previa. Both are fine the c-section went perfectly and the baby is beautiful he will be in the I.C.U. for a while as his lungs are still a little under devoloped. Overall a success, we were BLESSED!!! ~Brian
Monday, January 9, 2012
We're Winging it in the Nursery and I LOVE it!
 |
| Our New Nursery Theme Is Birds!!! |
This bird mobile project was so much fun!!! I have been in love with birds for quite a while now. I know I know, who hasn't right? I don't like to think of myself as one who follows the trends but in this case I think it is more like the trends have turned to my favor, (I love earthy, natural looking styles) so take it as you will.
 |
| Doesn't it make you feel so peaceful and happy?! |
I had actually already made a bird mobile but I didn't really like it very much, too small, goofy looking, too bland, I don't know. However, the other day I found a blog by Karen, who made what she lovingly calls "Wee Birds" (Tutorial Found Here) and I too loved them, their darling plump little bodies just make me happy, so much so that I decided to make a new mobile.
 |
| Our "new" Jenny Lynn crib and bird mobile together |
 |
| Guarding the nest |
Jenny lynn crib in my last post but...
 |
| Resting |
.....not so good. Blogger only posted a few of my photo's. Maybe later I'll go back and re-post the rest.
 |
| Bringing more straw..... |
 |
| ........to build the nest. |
 |
| Flying |
 |
| Sitting the Eggs |
 |
| Building the Nest |
 |
| The Nest |
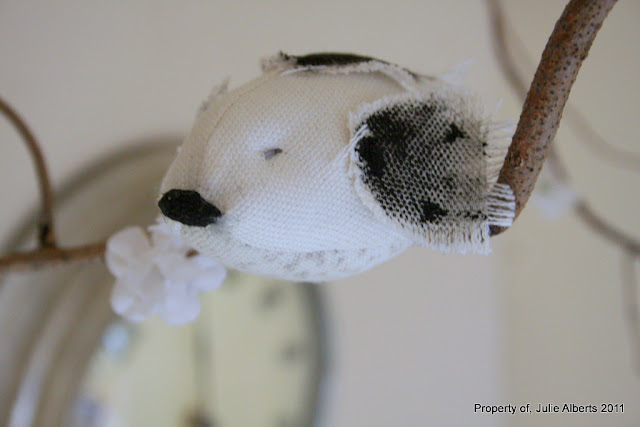
So I took a branch from a cork screw willow and added six of the birds, modified with fabric wings that I painted and frayed as well as doing slit eyes (more subtle and soft I thought) and I added a splash of flower blossoms and some raffia nests/nesting material and tadaaaaaa!
 |
| LOVE |
 |
| I thought it would be fun to have a bird or two "flying" around and then I came up with the idea of adding some raffia to the top birds beak as though he is building the nest and I fell in love! |
I love love love it! It is so sweet and soft and gently stimulating to sit and look at......at least it is for me, I hope baby likes it too.
 |
| We added this old drawer pull plate for charm |
 |
| I am not done with the crib remodel yet, still lots more sanding. |
We thought the piece above added some charm and.....age???
 |
| More distressing |
I'm hoping to get the crib wrapped up here soon because I really need to start working on the baby's blanket. I have always made one special blanket with a theme that seemingly suits them for each one of our children, I'll try to post some photo's on the blankets I have made along with the making of our newest "lankie" as I go about it. I'll also share a secret or two I found for making them, it is so much easier than the standard way.
Until next time I wish you all the best and please feel free to ask any questions you may have or post any comments, I always love to hear what others think!
Peace and good will to you all, Julie
Saturday, January 7, 2012
Jenny's new look!
Meet Jenny!
About a week ago a good friend of mine dropped off a Jenny Lynn style crib for me to repurpose, since drop sides aren't legal to sell any more (don't you just love it when friends know you so well). Any how, I had every intention of dismantling it and using it for various crafts.......but... I got to looking at it and thought maybe.......(I know, thinking is dangerous) maybe I could revamp it a bit and use it for this baby.
So this is the story of Jenny's makeover,
 |
| First I did a mock set up to be sure I liked it. |
I have been thinking for some time now that I would like to take a drop side that was destined for the dump and make it a solid side and and shrink it down. Babies do not need that much room to sleep!!!
 |
| Second I measured the sides to see how much I should take off . |
 |
| Here we are "dry fitting" the metal support. |
 |
| Just a glimpse of her before I go to bed. |
You have to look hard to see it in this photo but I am cleaning and distressing it a bit to add more character. So far I love how it is turning out!!! I'll post more pictures as we go Monday but for now it is time for bed and to get ready for the Sabbath!
Subscribe to:
Comments (Atom)


