Saturday, March 24, 2012

Spring Forward!

  I haven't had much time lately, in fact I am not keeping up with any of my homemaking duties by far but today I thought I would take a moment to post one thing I have accomplished,  fabric covered Easter eggs. I have said before that we don't really have any holiday decor, my children are getting old enough that I find myself wanting to teach them how to appreciate the good aspects of holidays and I also get to do a craft with them too. I stumbled across this cute tutorial on V & Co.s blog  for these cute eggs and last year I bought a big bag of styrofoam balls/eggs at a yard sale and I also had a big tin of hot glue, and random colorful fabric scraps, also purchased for pennies from yard sales over the years. I really wanted to let the kids be a big part of making them but the hot glue thing did me in. however V & Co. also has another tut on how to make some using plastic Easter eggs and mod podge HERE I plan on doing them with the kids in our next Family Home Evening. I'll post some photo's of them as we go. Until then, Happy Easter Everyone!!!
~Julie
Posted by Picasa

Tuesday, January 31, 2012

The Short arm of the Law.......or is it the Law of the Short Arm?!?


Why have we not figured out some clever way to moderate how much tissue paper a child can take when going potty???? How many times must we reach the bathroom door, as we dash around doing the "must do's" on our "to do" lists, only to find that we now have the pleasure of taking a break from the mundane to add the ever uglier task of assessing who is the culprit in the latest toilet paper disaster anddddd then clean IT up.....Eehhhhh (I shudder to the point of almost convulsing) ???? I have tried to teach my children to count the nearly invisible squares,  or to "just take a tiny piece", which almost always ends requiring more cleaning than if they hadn't taken any at all, and then there's my favorite option, stalking them every time they go potty so that you can help them take the right amount.  Well I in no ways claim to have the answer to an all important issue such as this but I have found a fairly successful trick until such a time comes as we find a real solution. I have simply taught my children to  measure the toilet paper against the length of their arms from their grip to the bend in their elbow. This little trick actually does work quite well, little arms are a lot shorter than little guesses on how m much to tissue to take!
 I am curious though, what do you do??? How have you managed the tissue issue in your house?

Tuesday, January 24, 2012

Let a little sunshine in!!!

Since our little bundle came early I have been working on doing all the final preparations I didn't get to do before he came. I have still not finished the sanding/distressing the crib yet but I also had another little project to add to the crib set so I finally took the time to do it. I took some of the rungs from the Jenny Lynn crib that we shrunk down for Aaron's nursery and combined them with and old wooden window (w/out the glass of course) and made a shelf / blanket rack for over his bed.
Shelf view 1


Shelf view 2


Close up
 

It is still all coming together and I want to do a few more things.... I just have to figure out what's missing and add it!!!  I'm sure this will not be the last you hear of it at least Haha :)


Monday, January 23, 2012

Our LITTLE bundle is here!!


Jan 11th:
Julie's water broke last night and she had her baby just before midnight, it's a little early and he is a little small weighing in at 4 pounds and 10 ounces. The delivery was a c-section because the baby was breech and placenta previa. Both are fine the c-section went perfectly and the baby is beautiful he will be in the I.C.U. for a while as his lungs are still a little under devoloped. Overall a success, we were BLESSED!!! ~Brian


Monday, January 9, 2012

We're Winging it in the Nursery and I LOVE it!

Our New Nursery Theme Is Birds!!!


This bird mobile project was so much fun!!! I have been in love with birds for quite a while now. I know I know, who hasn't right? I don't like to think of myself as one who follows the trends but in this case I think it is more like the trends have turned to my favor, (I love earthy, natural looking styles) so take it as you will.


Doesn't it make you feel so peaceful and happy?!


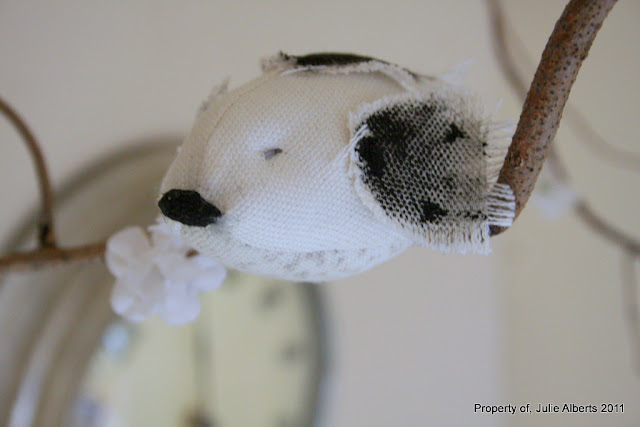
I had actually already made a bird mobile but I didn't really like it very much, too small, goofy looking, too bland, I don't know. However, the other day I found a blog by Karen, who made what she lovingly calls "Wee Birds" (Tutorial Found Here) and I too loved them, their darling plump little bodies just make me happy, so much so that  I decided to make a new mobile. 


Our "new" Jenny Lynn crib and bird mobile together
I tried to post some photo's of our 
Guarding the nest
adventure in remodeling this sweet
Jenny lynn crib in my last post but...
Resting
As you can see, if you go back there,
.....not so good. Blogger only posted a few of my photo's. Maybe later I'll go back and re-post the rest.        
Bringing more straw.....
In any case I love the "new" old crib and I wanted a mobile that I thought could keep up with my theme better.
........to build the nest.
Flying
I decided to use the birds but I was not too in love with their paper wings (too susceptible to damage)

Sitting the Eggs
Building the Nest


The Nest

So I took a branch from a cork screw willow and added six of the birds, modified with fabric wings that I painted and frayed as well as doing slit eyes (more subtle and soft I thought) and I added a splash of flower blossoms and some raffia nests/nesting material and tadaaaaaa!
LOVE

I thought it would be fun to have a bird or two "flying" around and then I came
up with the idea of adding some raffia to the top birds beak as though he is building
the nest and I fell in love!
I love love love it! It is so sweet and soft and gently stimulating to sit and look at......at least it is for me, I hope baby likes it too.  
We added this old drawer pull plate for charm


I am not done with the crib remodel yet, still lots more sanding.


We thought the piece above added some charm and.....age???


More distressing
We cut the crib down to 3 feet in length (no baby of mine has EVER needed a bed so large as a regular crib, and it fits nicely in the room.....plus it is unique! We also thought about the whole "drop side issue"  so we made it solid with two possible adjustments, you just take out four screws and move it up or down depending on the size of your baby then reset the screws.

I'm hoping to get the crib wrapped up here soon because I really need to start working on the baby's blanket. I have always made one special blanket with a theme that seemingly suits them for each one of our children, I'll try to post some photo's on the blankets I have made along with the making of our newest "lankie" as I go about it. I'll also share a secret or two I found for making them, it is so much easier than the standard way.

Until next time I wish you all the best and please feel free to ask any questions you may have or post any comments, I always love to hear what others think!

Peace and good will to you all, Julie

Saturday, January 7, 2012

Jenny's new look!


Meet Jenny!
About a week ago a good friend of mine dropped off a Jenny Lynn style crib for me to repurpose, since drop sides aren't legal to sell any more (don't you just love it when friends know you so well). Any how, I had every intention of dismantling it and using it for various crafts.......but... I got to looking at it and thought maybe.......(I know, thinking is dangerous) maybe I could revamp it a bit and use it for this baby. 


So this is the story of Jenny's makeover,

First I did a mock set up to be sure I liked it.


I have been thinking for some time now that I would like to take a drop side that was destined for the dump and make it a solid side and and shrink it down. Babies do not need that much room to sleep!!!


Second  I measured the sides to see how much I should take off .


My sweet Husband to the sides out and cut them off for me and then he took the spring style mattress support and cut it off and re-welded it to make it just the right size for my project. (Yes he is that great!!!)

Here we are "dry fitting" the metal support.


Just a glimpse of her before I go to bed.


You have to look hard to see it in this photo but I am cleaning and distressing it a bit to add more character. So far I love how it is turning out!!!  I'll post more pictures as we go Monday but for now it is time for bed and to get ready for the Sabbath!

Sunday, December 25, 2011

Our Hand(s)made

A few of our favorite projects from 2011.......
Grant's StackO's
Wild Wooden Animals

Evan's Toolbelt and Tools
Spoon Handles
Christmas tree orniments from branch rounds
Santa Sacks for the Kids

Repurposed "Sweater" Stockings


The Stockings were hung..........

And the sweaters repurposed!!!

The first year we were married, just 16 days before Christmas and just two weeks after my Husband returned from his two year mission for the Church of Jesus Christ of Latter Day Saints. ( I know it seems soon but a girl can only wait so long and two years is soooooo long :) Needless to say we didn't have much time to prepair for Christmas. We went and bought some stockings, they were just the .99 cent type and a FEW other little things. The next year our twins were born, just 14 days before Christmas and we had been so consumed with anticipation of their birth that we again had not prepaired. To our surprise my sweet Sister-in-Law went out and bought us two matching stockings for the twins and I personalized them with a little monogram on the front. Well here we are these seven years later and we have since had another little girl and two little boys (no not twins again, one at a time....wheeewh) and we are expecting our sixth sweet spirit in February, and I have still not done anything more permanent or personal for our stockings, in fact I haven't even finished monograming the last three stockings, so this year I decided to change that and make stockings from recycled sweaters. I had seen this done on a few sites and loved the results and of course the idea of repurposing and recycling always appeal to me. So I thought I would post about our homemade stockings out of upcycled sweaters . Well here they are! I think they turned out beautifully and we couldn't have enjoyed them more.


Top Left to Bottom Right: Grant's, Jessica's, Daddy's, Michelle's,
Mommy's, Kayla's, Evan's and the Tree ( I needed another picture for the collage to work)

As we prepared for this Christmas we reminisced about our childhood Christmas's, I recalled how every year we went to a Christmas party at our church and the "Santa" there would give each child a brown bag of goodies, namely: candy canes, assorted seasonal candies, peanuts, an orange, and a tiny dim store toy....there were probably a few other things in there too but that is not important. What does matter is that my fondest and most vivid memories of Christmas are always accompanied, and dare I say, preceded by a memory of the smells of that brown goody bag. I know it sounds a little odd, but somehow that combination of smells became the scent of Christmas too me. So as we discussed what to put in the kids stockings, if anything, I remembered that Brown bag. My Husband is so quick, he suggested that we fill (I.E a hand full) their stockings with Christmas candies and......an Orange. Of course I LOVED the idea!!! They didn't smell just the same, I don't think they even make those assorted Christmas candies anymore., but it was so much fun that the smells that we're absent in reality we're there in my mind. I think this is a great start to a family tradition I will truly enjoy!!! Merry Christmas Everyone!

My Husband adds, "and the kids loved it"!


..by the chiminy with care.....


Evan's


Daddy's


Jessica's


Kayla's


Mommy's


Michelle's


Grant's


Thursday, December 22, 2011

Christmas is a circus at our house this year!

I woke up yesterday in a "good" bad mood....... Let me explane, there are "bad" bad moods , where you just feel lousy and in seems to show uncontrolably and things seem to go from bad to worse all day! And there's "good" bad days when you let your frusteration fuel your ambitions! I had a "GOOD" bad day yesterday, I did school with ALL the kids, I washed every load of laundry but one (which was loaded but too late to run because I knew I would forget it and it would sour over night), I washed the dishes, picked up the house and got something done for Christmas gifts. The later of which is why I am posting today and the very reason (in a round about way) for my "good" bad mood. Whice brings us full circle, I woke up this morning feeling pretty chipper until I thought about the fact that Christmas is Sunday and we have a few tiny stocking stuffers and that is it. Don't get me wrong, I am not concerned that my children will miss out on the me, me, me, mines of Christmas, I just know there are some fun things I've been crazy to make for them and they are simple and fun gifts that won't cost us a penny to make, just my time, and I think that is my idea of Christmas this year, "Gifts from the heart". So to get on with it, I decided to make them some cut little wooden animals after purchasing a cute little elephant at a yard sale this year. I finally sat down with my trusty scroll saw and cut out all the pieces last night. I used the elephants body shape to trace for the others and then I designed, transfered and cut the other animals. This morning I had to go to the Dr.s for a 3 hour glucose testing because I failed the 1 hour test last week, I knew those super yummy blueberry pancakes I ate before my apt. with syrup and homemade eggnog would catch up to me, just not so soon! Any how, after I got home this morning afternoon I went straight to work sanding, gluing and painting them. Each one is appproximately 4-5+ in. from tip to tail, by 3 in. wide, by 4 in. tall. 
The Gang

Panda

Lion

Koala

ZEBRA

MONKEY

HIPPO
ELEPHANT


POLAR BEAR


READY FOR THE CIRCUS!
                            I am overall very pleased with the outcome, what do you think?!?!