 |
| Our New Nursery Theme Is Birds!!! |
This bird mobile project was so much fun!!! I have been in love with birds for quite a while now. I know I know, who hasn't right? I don't like to think of myself as one who follows the trends but in this case I think it is more like the trends have turned to my favor, (I love earthy, natural looking styles) so take it as you will.
 |
| Doesn't it make you feel so peaceful and happy?! |
I had actually already made a bird mobile but I didn't really like it very much, too small, goofy looking, too bland, I don't know. However, the other day I found a blog by Karen, who made what she lovingly calls "Wee Birds"
(Tutorial Found Here) and I too loved them, their darling plump little bodies just make me happy, so much so that I decided to make a new mobile.
 |
| Our "new" Jenny Lynn crib and bird mobile together |
I tried to post some photo's of our
 |
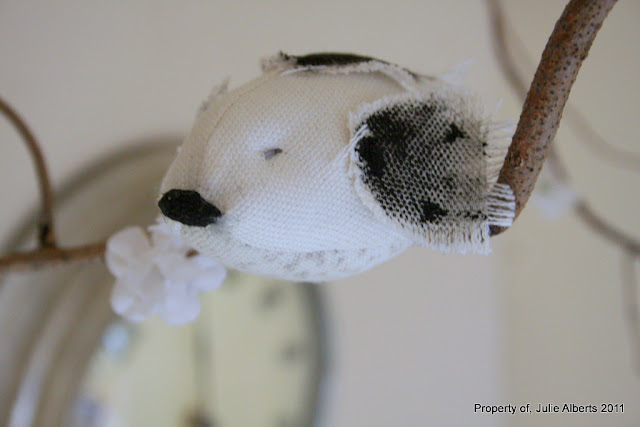
| Guarding the nest |
adventure in remodeling this sweet
Jenny lynn crib in my last post but...
 |
| Resting |
As you can see, if you go back there,
.....not so good. Blogger only posted a few of my photo's. Maybe later I'll go back and re-post the rest.
 |
| Bringing more straw..... |
In any case I love the "new" old crib and I wanted a mobile that I thought could keep up with my theme better.
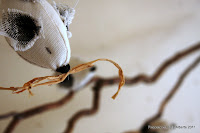 |
| ........to build the nest. |
 |
| Flying |
I decided to use the birds but I was not too in love with their paper wings (too susceptible to damage)
 |
| Sitting the Eggs |
 |
| Building the Nest |
 |
| The Nest |
So I took a branch from a cork screw willow and added six of the birds, modified with fabric wings that I painted and frayed as well as doing slit eyes (more subtle and soft I thought) and I added a splash of flower blossoms and some raffia nests/nesting material and tadaaaaaa!
 |
| LOVE |
 |
I thought it would be fun to have a bird or two "flying" around and then I came
up with the idea of adding some raffia to the top birds beak as though he is building
the nest and I fell in love! |
I love love love it! It is so sweet and soft and gently stimulating to sit and look at......at least it is for me, I hope baby likes it too.
 |
| We added this old drawer pull plate for charm |
 |
I am not done with the crib remodel yet, still lots more sanding.
|
We thought the piece above added some charm and.....age???
 |
| More distressing |
We cut the crib down to 3 feet in length (no baby of mine has EVER needed a bed so large as a regular crib, and it fits nicely in the room.....plus it is unique! We also thought about the whole "drop side issue" so we made it solid with two possible adjustments, you just take out four screws and move it up or down depending on the size of your baby then reset the screws.
I'm hoping to get the crib wrapped up here soon because I really need to start working on the baby's blanket. I have always made one special blanket with a theme that seemingly suits them for each one of our children, I'll try to post some photo's on the blankets I have made along with the making of our newest "lankie" as I go about it. I'll also share a secret or two I found for making them, it is so much easier than the standard way.
Until next time I wish you all the best and please feel free to ask any questions you may have or post any comments, I always love to hear what others think!
Peace and good will to you all, Julie


 I haven't had much time lately, in fact I am not keeping up with any of my homemaking duties by far but today I thought I would take a moment to post one thing I have accomplished, fabric covered Easter eggs. I have said before that we don't really have any holiday decor, my children are getting old enough that I find myself wanting to teach them how to appreciate the good aspects of holidays and I also get to do a craft with them too. I stumbled across this cute tutorial on V & Co.s blog for these cute eggs and last year I bought a big bag of styrofoam balls/eggs at a yard sale and I also had a big tin of hot glue, and random colorful fabric scraps, also purchased for pennies from yard sales over the years. I really wanted to let the kids be a big part of making them but the hot glue thing did me in. however V & Co. also has another tut on how to make some using plastic Easter eggs and mod podge HERE I plan on doing them with the kids in our next Family Home Evening. I'll post some photo's of them as we go. Until then, Happy Easter Everyone!!!


